All posts by John Blackbourn

A History of WordPress Contributors

I thought I’d run some stats on WordPress contributors over the years. The only contributor stats I have are the ones published in each release announcement on wordpress.org, so I’ve put these stats together myself from those lists.

Unfortunately the release announcements have only listed the contributors since version 2.9 (June 2009). If anyone wants to get me the list of contributors for earlier versions I’ll happily update this post. It’d be interesting to see the numbers over the years.

Contributors by Version

Version 3.0 has so far seen the highest number of individual contributors. The latest version – 3.4 – comes in second with 187. I thought I might see a steady increase with each version, but this is not the case, and we’ll see why below.

Also shown is the number of Trac tickets closed with each version. There’s a noticable reduction in the number of tickets closed since version 3.0 which closed over 1,200 tickets, with recent releases closing fewer than half that number. This correlates nicely with the recent drive to clearly define the scope of each release. We can probably all agree that Jane Wells is to thank for playing a big part in keeping WordPress releases on schedule recently.

Version Contributors Tickets Closed
3.4 183  592
3.3 179  587
3.2 132  409
3.1 173  840
3.0 210 1217
2.9 145  501

Version Involvement

WordPress sees long-term involvement from many people. Almost two hundred people have contributed to at least two different versions of WordPress since 2.9. The list got a bit long, so below I’ve listed the 120 people who have contributed to at least three out of the six versions released. While it’s not a good indication of the level of contributions by each person, it does demonstrate active involvment and an ongoing commitment.

Versions Involved In Person
6 aaroncampbell
batmoo
dd32
demetris
filosofo
johnbillion
johnjamesjacoby
josephscott
mdawaffe
nacin
otto42
scribu
yoavf
5 alexkingorg
arena
azaozz
coffee2code
dougwrites
duck_
ericmann
garyc40
hakre
iammattthomas
iandstewart
joostdevalk
koopersmith
lancewillett
lloydbudd
markjaquith
mattyrob
miqrogroove
mitchoyoshitaka
nathanrice
nbachiyski
niallkennedy
ocean90
petemall
ptahdunbar
ramiy
ryan
sergeybiryukov
simonwheatley
sivel
solarissmoke
sorich87
tenpura
utkarsh
viper007bond
westi
zeo
4 aldenta
ampt
andy
blepoxp
caspie
chrisbliss18
cyberhobo
empireoflight
greenshady
jamescollins
jane
jayjdk
jeremyclarke
johnonolan
jorbin
kawauso
kevinb
koke
markmcwilliams
matveb
mfields
nao
prettyboymp
sirzooro
vanillalounge
wpmuguru
3 andrea_r
andrewryno
barry
boonebgorges
caesarsgrunt
chexee
chipbennett
denis-de-bernardy
dh-shredder
dimadin
dllh
greuben
helenyhou
ipstenu
jacobsantos
jfarthing84
johnpbloch
kovshenin
latz
linuxologos
markoheijnen
michaelh
mikeschinkel
mrmist
pavelevap
peaceablewhale
rasheed
redsweater
rmccue
rosshanney
ruslany
saracannon
sbressler
simek
technosailor
thedeadmedic
tobiasbg
trepmal
usermrpapa
vladimir_kolesnikov
wahgnube
wnorris
xibe
xknown

Total Contributors

WordPress has seen 541 individual contributors over the three years and six versions since 2.9 in July 2009.

And Finally

It’s unfortunate that it’s not as simple to measure the involvement of all those people who contribute to WordPress in ways other than Trac tickets and patches. There are literally hundreds of people who spend their time helping others on the support forums and mailing lists, those who organise and attend WordCamps and WordPress meetups, and those who build and release plugins & themes. Without those people, the almost ten thousand improvements to WordPress wouldn’t be so useful.

Stats Elsewhere

A few other people have previously generated stats regarding contributors to WordPress. If you know of any more articles on contributor stats, leave a comment and I’ll add them to the list.

WordPress Plugin: Pocket Read It Later Links

Latest version: 1.0- Released June 15th, 2012:

  • Initial release.

Description

This plugin allows you to display Pocket 'Read It Later' links next to each post on your blog. You can see an example on the Pocket blog. You can automatically insert the links adjacent to your blog posts or you can use the template tag to insert the links wherever you like.

What the hell is Pocket?

From getpocket.com:

Pocket (formerly Read It Later) helps people who discover an interesting article, video or web page, but don’t have time to view it. Once saved to Pocket, the list of content is visible on any device — phone, tablet or computer. It can be viewed while waiting in line, on the couch or during commutes or travel — even offline.

Check out getpocket.com for all the details and to sign up.

  1. pocket screenshot 1

    'Read It Later' links inserted automatically into the WordPress default theme

  2. pocket screenshot 2

    The options screen

Installation

You can install this plugin directly from your WordPress dashboard:

  1. Go to the Plugins menu and click Add New.
  2. Search for Pocket Read It Later Links.
  3. Click Install Now next to the Pocket Read It Later Links plugin.
  4. Activate the plugin.

Alternatively, see the guide to Manually Installing Plugins.

Once activated, check out the front page of your blog. A ‘Read It Later’ link will now show adjacent to each post.

Usage

By default, this plugin adds a ‘Read It Later’ link adjacent to each blog post on your blog. You can control where the ‘Read It Later’ links show up by going to the Settings -> Pocket Links menu in WordPress.

Download

This plugin requires WordPress version 3.3 or later. Tested up to 3.4.2.

Version 1.0 ZIP file from downloads.wordpress.org

Any comments, questions, queries, suggestions, complaints, etc, please leave a comment!

Saving Post Meta Field Revisions in WordPress

If your plugin or theme uses custom post meta fields then you may want to store revisions to these fields when a post revision is saved. It’s easy to do.

For each of our meta fields, we’ll need to do three things:

  1. Store a revision of the meta field when a post is saved
  2. Revert to the correct revision of the meta field when a post is reverted
  3. Optionally, display the meta field on the revisions screen

In the code below I’m just saving revisions to one meta field, ‘my_meta’. You can of course save revisions to more than one meta field by looping over a list of fields your plugin uses.

Sorry about the poor code formatting in this article. I really need to fix the CSS on my site.

Storing a revision of the meta field when a post is saved

For this we hook into the save_post action and save the post meta data only if the post being saved is a revision. We need to use the low level add_metadata() function because if we use add_post_meta() then the meta data will be stored against the post instead of the revision.

function my_plugin_save_post( $post_id, $post ) {

        $parent_id = wp_is_post_revision( $post_id );

        if ( $parent_id ) {

                $parent  = get_post( $parent_id );
                $my_meta = get_post_meta( $parent->ID, 'my_meta', true );

                if ( false !== $my_meta )
                        add_metadata( 'post', $post_id, 'my_meta', $my_meta );

        }

}
add_action( 'save_post', 'my_plugin_save_post' );

Reverting to the correct revision of the meta field when a post is reverted

For this we hook into the wp_restore_post_revision action and update the meta field to the version stored at the revision we’re reverting to. Again we’re using the low level get_metadata() function instead of get_post_meta() so we can grab the meta data from the revision instead of the current post.

function my_plugin_restore_revision( $post_id, $revision_id ) {

        $post     = get_post( $post_id );
        $revision = get_post( $revision_id );
        $my_meta  = get_metadata( 'post', $revision->ID, 'my_meta', true );

        if ( false !== $my_meta )
                update_post_meta( $post_id, 'my_meta', $my_meta );
        else
                delete_post_meta( $post_id, 'my_meta' );

}
add_action( 'wp_restore_post_revision', 'my_plugin_restore_revision', 10, 2 );

Displaying the meta field on the revisions screen

For this we need to hook into the _wp_post_revision_fields action to tell WordPress which fields to show on the revisions screen, and hook into the _wp_post_revision_field_my_meta filter to display the meta field. Note that the filter name is specific for each field, so you’ll need to add a hook for each of your meta fields in the format _wp_post_revision_field_{field_name}.

function my_plugin_revision_fields( $fields ) {

        $fields['my_meta'] = 'My Meta';
        return $fields;

}
add_filter( '_wp_post_revision_fields', 'my_plugin_revision_fields' );

function my_plugin_revision_field( $value, $field ) {

        global $revision;
        return get_metadata( 'post', $revision->ID, $field, true );

}
add_filter( '_wp_post_revision_field_my_meta', 'my_plugin_revision_field', 10, 2 );

Putting it all together

Download the example code as a plugin here.

You’ll need to manually add/edit the ‘foo’ field using the Custom Fields panel on the post editing screen, then you can play around with viewing and reverting revisions.

Some considerations

The code used to display the meta field on the revisions screen will generate a PHP notice because WordPress looks for the my_meta element of the post object before calling the field callback function. There’s a ticket on Trac somewhere about improvements to the revisions screen but I can’t find it currently.

When you compare two post revisions using the compare functionality on the revisions screen the meta fields won’t be taken into account. Again, the revisions screen in WordPress needs some improvements in this area.

Access Your Desktop Development Environment from Your Mobile Device

It’s really easy to get an iPhone, iPad or other iOS device to access a local web server running on your development machine. All you need is Charles Proxy running on your development machine (which you should have anyway, as it’s invaluable). Once that’s running:

Make sure your iOS device is connected to the same network as your development machine. Go into the Settings -> Wi-Fi menu on your iOS device and click the arrow next to your network. From there switch the HTTP proxy setting to manual and enter your development environment machine’s network IP address (eg. 192.168.0.4) as the server, and 8888 as the port (Charles’ default port unless you’ve changed it).

Voila. All your HTTP traffic from your iOS device will now route through Charles running on your desktop (Charles will prompt you to allow access first) and you’ll have access to your local development server. Awesome!

Aside: Android users, you’ve not got it as easy. There aren’t any HTTP proxy settings in Android (who said Android was an open platform?) so unless you’re willing to jailbreak your Android you’re out of luck. There may well be similar proxy settings for other mobile OSes. A quick Google will usually give you the answer.

Pro Tip: Are you still editing your hosts file in order to manage the host name mapping for sites on your development environment? Stop it. Just use the Tools -> DNS Spoofing menu in Charles and make life easier for yourself.

Basic Authentication with the WordPress HTTP API

Basic Authentication (or BasicAuth) is not natively handled with the WordPress HTTP API. This means when you’re using functions such as wp_remote_get() and wp_remote_post() there’s no immediately obvious way to send Basic Authentication headers with your request. It would be great to pass username and password parameters to these functions, but it’s not there.

Fear not though, it’s really easy. Here’s how:

$args = array(
'headers' => array(
'Authorization' => 'Basic ' . base64_encode( YOUR_USERNAME . ':' . YOUR_PASSWORD )
)
);
wp_remote_request( $url, $args );

That’s it. The correct authentication headers will then be sent with your request (after you’ve replaced YOUR_USERNAME and YOUR_PASSWORD with the obvious).

I’d like to give a quick shout out to my favourite HTTP monitor Charles Proxy. I use Charles almost daily when dealing with server-side HTTP requests and AJAX requests and it makes life much easier. I love it.

WordPress Plugin: Feed Thumbnails

Latest version: 1.2- Released July 4th, 2010
  • Bugfix for the Get The Image plugin integration.

Description

This plugin simply adds your post thumbnails to your feed as RSS enclosures. Nothing else to it. If you don't use thumbnails or you don't know what enclosures are or why you might want them, then this probably isn't for you.

The plugin supports the Post Thumbnail feature built into WordPress and the Get The Image plugin by Justin Tadlock.

Installation

  1. Unzip the ZIP file and drop the folder straight into your wp-content/plugins/ directory.
  2. Activate the plugin through the 'Plugins' menu in WordPress.
  3. View your feed (you might need to do a hard refresh - ctrl+reload) and any posts that have a thumbnail defined will have an enclosure containing a link to the thumbnail.

Download

This plugin requires WordPress version 2.9 or later.

Version 1.2 ZIP file from downloads.wordpress.org

Any comments, questions, queries, suggestions, complaints, etc, please leave a comment!

Twitter Bookmarklet: View the Whole Conversation

Do you ever view a Twitter update (or a “tweet”) which is part of a conversation and wish there was an easy way to view the entire conversation?

It’s not easy to do. (We’re talking about the web interface here, it’s undoubtedly easy for those who use Twitter clients.) This is why I’ve written the Twitter Conversation Bookmarklet.

Update: This bookmarklet is now a web service by me. Check out Twitlr!

Installation

Drag the following link to your browser’s Bookmarks Toolbar:

[twitter conversation]

Usage

Simply press the bookmarklet whenever you’re on a Twitter status page that is part of a conversation, and the entire conversation will be magically loaded onto the page.

Example

The best way to see an example is just to install the bookmarklet and then hit it on a status page. An example status where it works well is this recent tweet by Damien Mulley which is part of a conversation.

Results of the Twitter conversation bookmarklet

Known Issues

  • Currently, the bookmarklet won’t return a conversation if you use it on the first tweet that is part of a conversation. It must be used on a tweet that is replying to another. This appears to be a limitation of the Twitter API but I am looking into ways to work around this.

Comments and bug reports appreciated.

WordPress Plugin: Disable Theme Updates

Latest version: 1.1 – Released June 15th, 2012

All the information for this plugin can be found over at the WordPress Plugin Directory: Disable WordPress Theme Updates.

Don’t forget you can also disable WordPress core updates and disable WordPress plugin updates too.

WordPress Plugin: Logout Password Protected Posts

Latest version: 0.2 – Released November 3rd, 2012

Description

There is no built-in way for your visitors to "log out" of password protected posts once they've entered the password. Even logged in users cannot log out of password protected posts by logging out of their account. This plugin solves that problem by providing a link for your visitors to log out of password protected posts.

After installing the plugin, add <?php do_action('posts_logout_link'); ?> somewhere in your theme to display a link for logging out of password protected posts.

Installation

You can install this plugin directly from your WordPress dashboard:

  1. Go to the Plugins menu and click Add New.
  2. Search for Logout Password Protected Posts.
  3. Click Install Now next to the Logout Password Protected Posts plugin.
  4. Activate the plugin.
  5. Add <?php do_action('posts_logout_link'); ?> somewhere in your theme.

Those people who are logged in to password protected posts will now see a link to log out.

For manual installation, see the guide to Manually Installing Plugins.

FAQ

I can't see a link to log out. What's up?

Have you added the template tag somewhere in your theme? You need to add <?php do_action('posts_logout_link'); ?> somewhere in your theme for the link to show up.

I've added the template tag to my theme but I can't see the log out link. What's up?

Ensure that you have entered a password for a password protected post. The link will not show up if you're not logged into a password protected post.

Can I change the default text in the link?

Sure. Add a second parameter to the template tag with the text you'd like instead. For example: <?php do_action('posts_logout_link','Log out!'); ?>

For those who want even more control, you can also add a third paramter which will be used as the class name on the link element.

Download

Version 0.2 ZIP file from downloads.wordpress.org

Any comments, questions, queries, suggestions, complaints, etc, please leave a comment!

WordPress Plugin: User Switching

Latest version: 0.8- Released June 13th, 2013:
  • Nested switching and switching back is now supported (capability permitting). Switch, switch again, switch back, switch back!
  • Fix for BuddyPress 1.7 member profile pages. Props nat0n.
  • Updated Arabic translation by Hassan Hisham.
  • A little code refactoring and improving, completed inline docs.

Description

This plugin allows you to quickly swap between user accounts in WordPress at the click of a button. You'll be instantly logged out and logged in as your desired user. This is handy for test environments where you regularly log out and in between different accounts, or for adminstrators of sites who need to switch between multiple accounts.

Features

  • Switch users: Instantly switch to any user account from the Users screen.
  • Switch back: Instantly switch back to your originating account.
  • Switch off: Log out of your account but retain the ability to instantly switch back in again.
  • It's completely secure (see the Security section below).
  • Compatible with WordPress, WordPress Multisite and BuddyPress.

Security

  • Only users with the ability to edit other users can switch user accounts (by default this is only Administrators on single site installs, and Super Admins on Multisite installs). Lower level users cannot switch accounts.
  • User switching is protected with WordPress' nonce security system, meaning only those who intend to switch users can switch.
  • Full support for administration over SSL (if applicable).
  • Passwords are not (and cannot be) revealed.
  • Originating user information is stored in the same secure manner as authentication cookies.

Translations Included

  • Chinese Simplified by Tunghsiao Liu (Sparanoid)
  • German by Ralph Stenzel
  • Farsi (Persian) by Amin Ab
  • Slovak by Max Samael
  • Polish by Bartosz Arendt
  • Lithuanian by Tommixoft
  • Arabic by Hassan Hisham

Screenshots

  1. user-switching screenshot 1

    The Switch To link on the Users screen

  2. user-switching screenshot 2

    The Switch To link on a user's profile

Installation

You can install this plugin directly from your WordPress dashboard:

  1. Go to the Plugins menu and click Add New.
  2. Search for User Switching.
  3. Click Install Now next to the User Switching plugin.
  4. Activate the plugin.

Alternatively, see the guide to Manually Installing Plugins.

Usage

Visit the Users menu in WordPress and you'll see a Switch To link next to each user. Clicking this will immediately switch you into that user account. Once switched, you can switch back to your originating account via the Switch back link on each dashboard screen and in your profile menu in the WordPress toolbar.

See the FAQ for information about the Switch Off feature.

Todo list

  • A custom capability (eg. ‘switch_users’) which can be granted to lower level users so they can switch accounts. Done!
  • Some way of switching back to the administrator account after switching to a lower level account (will require a cookie-based remembering system which doesn’t compromise security).
    Done!
  • A persistent notification in the admin area reminding you that this is an account you switched to and not your account (also reliant on solution above). Done!

FAQ

What does "Switch off" mean?

Switching off logs you out of your account but retains your user ID in an authorisation cookie so you can switch straight back without having to log in again manually. It's akin to switching to no user, and being able to switch back.

The Switch Off link can be found in your profile menu in the WordPress toolbar. Once you've switched off you'll see a Switch back link in the footer of your site.

Does this plugin work with WordPress Multisite?

Yes, and you'll also be able to switch users from the Users screen in Network Admin.

Does this plugin work with BuddyPress?

Yes, and you'll also be able to switch users from member profile screens and the member listing screen.

Does this work as a mu-plugin?

Yes, but you'll need to install user-switching.php into the root of your mu-plugins directory, not in the user-switching subdirectory. This is a restriction of WordPress.

What capability does a user need in order to switch accounts?

A user needs the edit_users capability in order to switch user accounts. By default only Administrators have this capability, and with Multisite enabled only Super Admins have this capability.

Can regular admins on Multisite installs switch accounts?

No. This can be enabled though by installing the User Switching for Regular Admins plugin.

Are any hooks called when users switch accounts?

Yes. When a user switches to another account, the switch_to_user hook is called with the new and old user IDs passed as parameters.

When a user switches back to their original account, the switch_back_user hook is called with the new (original) and old user IDs passed as parameters.

When a user switches off, the switch_off_user hook is called with the old user ID as a parameter.

Download

This plugin requires WordPress version 3.1 or later.

View the plugin on WordPress.org.

Version 0.8 ZIP file from downloads.wordpress.org

Any comments, questions, queries, suggestions, complaints, etc, please leave a comment!

WordPress Plugin: Instapaper ‘Read Later’ Links

Latest version: 1.2- Released June 15th, 2012:
  • Update to the new style button from Instapaper. The original black version no longer works.

Description

This plugin allows you to display Instapaper ‘Read later’ links next to each post on your blog just like on Give Me Something To Read. You can either automatically insert the links adjacent to your blog entries, or you can just use the template tag to insert the links wherever you like.

What the hell is Instapaper?

From instapaper.com:

Instapaper is a fast, easy, free tool to save web pages for reading later. When you find something you want to read, but you don’t have time now, you click ‘Read Later’. When you do have time to read, you visit Instapaper on your computer or phone and get whatever you wanted to read.

Check out instapaper.com for all the details and to sign up.

Can I see an example?

The plugin is active on this very blog, so ‘Read Later’ links should show up next to each post title on here.

Screenshot of the plugin in action on the Kubrick theme

The plugin in action on the Kubrick theme

Screenshot of the plugin Settings screen

The plugin Settings screen

Installation

  1. Unzip the ZIP file and drop the folder straight into your ‘wp-content/plugins-’ directory.
  2. Activate the plugin through the ‘Plugins’ menu in WordPress.
  3. Check out the front page of your blog. A ‘Read Later’ link will now show adjacent to each post.

Usage

By default, this plugin displays a ‘Read Later’ link adjacent to each blog entry on your blog. If you wish to control where the links are displayed, you can go to the Settings -> Read Later Links menu and choose between a few display options.

If you choose to disable automatic placement, you’ll need to add the following code to your theme in order insert the ‘Read Later’ link for each post:

<?php do_action('read_later'); ?>

The code must be inside the WordPress loop.

Thanks

Download

This plugin requires WordPress version 2.7 or later. Tested up to 3.4.2.

Version 1.2 ZIP file from downloads.wordpress.org

Any comments, questions, queries, suggestions, complaints, etc, please leave a comment!

WordPress Plugin: Plugin Info

Latest version: 0.7.9- Released April 7th, 2013

Description

This plugin provides a simple way of displaying up-to-date information about specific plugins hosted on the WordPress Plugin Directory in your blog posts and pages. It is intended for plugin authors who want to display details of their own plugins from the WP Plugin Directory on their blog and want those details to remain up to date. It’s also useful for bloggers who may blog about plugins and would like the details in their blog posts to remain up to date.

Er, what?

You want to blog about a particular plugin on your blog and include various details of it in your blog post (eg. the number of downloads or the last updated date). You could manually type this information into your post but this means that in a few days/weeks/months’ time the information will be out of date.

This plugin allows you to use shortcodes in your blog posts and pages which fetches this information right from the WordPress Plugin Directory, therefore ensuring the information always remains up to date.

Here’s an example

This plugin uses shortcodes so it’s ridiculously easy to include any information about a particular plugin in your post or page:

This plugin has been downloaded [plugin downloaded] times!

This will produce the following content in your blog post:

This plugin has been downloaded 1,650 times!

The download count will remain current without you having to touch your blog post again.

Is this plugin for me?

This plugin is only going to be of use to you if:

  1. You are a plugin author and you want a ridiculously easy way to include up to date information about any of your plugins in your blog posts or pages.
  2. You are the author of a blog that highlights plugins of interest and you want to ensure that information in your posts remains up to date.

Installation

  1. Unzip the ZIP file and drop the folder straight into your wp-content/plugins directory.
  2. Activate the plugin through the ‘Plugins’ menu in WordPress.
  3. Now read the usage guidelines below.

Usage

  1. Write a new blog post or page, or open an existing post or page for editing.
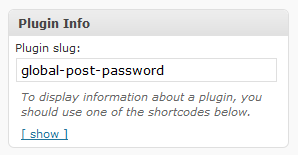
  2. In the ‘Plugin Info’ box on that screen, type the slug of the plugin like this:
    'Plugin Info' plugin screenshot
    (The plugin slug is the last part of the URL of the plugin’s page on wordpress.org.)
  3. Add a shortcode to your blog entry like this: [plugin downloaded] and save the post. (That’s the word ‘plugin’ and not the slug of your plugin by the way).
  4. Take a look at your post and the number of dowloads of the plugin will be displayed.

Which attributes can I display?

Below is a list of all the available shortcodes.

Plain info:

  • [plugin author_name] – The plugin author’s name
  • [plugin author_url] – The URL of the plugin author’s homepage
  • [plugin compatibility] – The compatibility concensus with the most recent version of WordPress (as a %)
  • [plugin compat_with] – The version of WordPress used for the compatibility concensus (ie. the latest WordPress version, eg. “2.8.5″)
  • [plugin download_url] – The URL of the plugin’s ZIP file
  • [plugin downloaded] – The all time download count with comma-separated thousands (eg. “12,345″)
  • [plugin homepage_url] – The URL of the plugin’s homepage
  • [plugin link_url] – The URL of the plugin’s page on the WP Plugin Directory
  • [plugin name] – The plugin name
  • [plugin profile_url] – The URL of the author’s profile on WP.org
  • [plugin requires] – The ‘Requires at least’ WP version number
  • [plugin rating] – The plugin’s star rating as a whole number out of 5 (given by visitors to wp.org)
  • [plugin slug] – The plugin slug
  • [plugin tags] – A comma-separated list of the plugin’s tags
  • [plugin tested] – The ‘Tested up to’ WP version number
  • [plugin updated_ago] – How long ago the plugin was last updated (eg. “20 days ago”)
  • [plugin updated] – The date the plugin was last updated, formatted according to your Date Format settings under Settings->General (eg. “20 January 2009″)
  • [plugin version] – The plugin version number

Formatted info (eg. links and ordered lists):

Most shortcodes which display a formatted link can have their default link text overridden by adding a ‘text’ parameter. For example: [plugin homepage text=’Homepage’] will display a link to the plugin homepage with the link text ‘Homepage’.

  • [plugin author] – A formatted link to the plugin author’s homepage with the author’s name as the link text (if the author doesn’t have a homepage this will just display their name)
  • [plugin description] – The full description of the plugin
  • [plugin download] – A formatted link to the plugin’s ZIP file with ‘Download’ as the link text
  • [plugin homepage] – A formatted link to the plugin’s homepage with ‘Visit plugin homepage’ as the link text
  • [plugin link] – A formatted link to the plugin’s page on the WP Plugin Directory with the plugin name as the link text
  • [plugin profile] – A formatted link to the author’s WP.org profile page with the author’s name as the link text
  • [plugin screenshots] – The list of the screenshots attached to the plugin (an <ol> list of <img> tags with descriptions)
  • [plugin changelog] – The list of changelog entries
  • [plugin latest_change] – Just the latest changelog entry
  • [plugin other_notes] – The ‘Other Notes’ section of the plugin

Some less useful raw data:

  • [plugin downloaded_raw] – The all time download count as a raw number (eg. “12345″)
  • [plugin num_ratings] – The number of people who’ve rated the plugin on wp.org
  • [plugin rating_raw] – The plugin’s actual average rating as a score out of 100 (given by visitors to wp.org)
  • [plugin updated_raw] – The date the plugin was last updated, in the format “yyyy-mm-dd”

The geek stuff

The plugin information is collected from wp.org each time you save your post or page. It is updated hourly using WordPress’ cron system and uses the Plugin API available in WordPress 2.7 or later. The plugin data is stored as an associative array in a custom field called ‘plugin-info’, and the plugin slug you enter is saved as a custom field called ‘plugin’. For supergeeks, this means you can also access the plugin data using get_post_meta(), but I’ll let you figure that out for yourself.

Todo list

  • A shortcode for a standard information box which contains all the essential plugin info in a nice format.
  • Possibly allow shortcodes in the title of posts.
  • Clickable shortcoces listed on the post editing screen.
  • A shortcode for a link to the author’s wordpress.org profile page (pending support in the Plugin API).
  • A shortcode for the ‘Other Notes’ section of the plugin (pending support in the Plugin API).
  • A simple UI for adding the plugin slug info to posts so you don’t have to use the Custom Fields directly.
  • Periodically update the data for all of your plugins from wordpress.org.

Download

This plugin requires WordPress version 2.7 or later.

Version 0.7.9 ZIP file from downloads.wordpress.org

Any comments, questions, queries, suggestions, complaints, etc, please leave a comment!

WordPress Plugin: MagpieRSS Hotfix for Enclosure Support and Character Encoding Issues

Latest version: 1.2 – Released 16th December 2008

Description

This hotfix adds support for RSS enclosures to MagpieRSS, the RSS parser behind the fetch_rss() function in WordPress. It also forces MagpieRSS to use UTF-8 character encoding, which fixes some issues with feeds that contain non-ASCII characters.

Is this plugin for me?

This plugin is only going to be of use to you if:

  1. You are fetching feeds on your blog with the fetch_rss() function and want to parse enclosures contained in the feed; or
  2. You are fetching feeds on your blog either with the RSS Sidebar Widget or with fetch_rss() and question marks are showing up somewhere in the feed where special characters are supposed to be.

Installation

  1. Unzip the ZIP file and drop the folder straight into your wp-content/plugins directory.
  2. Activate the plugin through the ‘Plugins’ menu in WordPress.
  3. That’s it! You can now parse enclosures contained in feeds fetched by WordPress.

Download

ZIP file from downloads.wordpress.org

FAQ

For FAQs, including how to parse enclosures in your feed, please see the plugin’s FAQ page on wordpress.org.

Any comments, questions, queries, suggestions, complaints, etc, please leave a comment!

WordPress Plugin: Image Upload HTTP Error Fix

This plugin is extremely oldno longer maintained and should no longer be used.

Description

Fixes the media uploader HTTP Error that some WordPress configurations suffer from.

If your WordPress 2.5 installation shows an HTTP Error when uploading files using the media uploader, then this plugin should fix that problem. Simply upload and activate the plugin, then you’ll be able to upload files with no problem.

Technical details:

The plugin adds a few lines to WordPress’ .htaccess file which deactivates mod_security on the file which handles file uploads.

Installation

  1. Unzip the ZIP file and drop the folder straight into your wp-content/plugins/ directory.
  2. Activate the plugin through the ‘Plugins’ menu in WordPress.
  3. That’s it! Try uploading a file with the media uploader and the HTTP error should be gone.

Download

ZIP file from downloads.wordpress.org

Any comments, questions, queries, suggestions, complaints, etc, please leave a comment!

WordPress Plugin: Google AJAX Libraries API

Important: This plugin is no longer being updated. It has been superceded by the good work of Jason Penney with his Use Google Libraries WordPress plugin which uses code based on this plugin. I recommend that you use his plugin from now on.

Description

This plugin replaces the most common JavaScript libraries in WordPress with the corresponding files on Google AJAX Libraries.

“The AJAX Libraries API is a content distribution network and loading architecture for the most popular open source JavaScript libraries.”

Note that this plugin does not actually replace or remove any files from your WordPress installation. It simply replaces any references to them with references to the corresponding files on Google AJAX Libraries.

Installation

  1. Unzip the ZIP file and drop the folder straight into your wp-content/plugins/ directory.
  2. Activate the plugin through the ‘Plugins’ menu in WordPress.
  3. That’s it!

Which Libraries are Supported?

The current version of the plugin supports the following JavaScript libraries:

Download

ZIP file from downloads.wordpress.org
You should use the ‘Use Google Libraries’ WordPress plugin instead now.

WordPress Plugin: Disable WordPress Plugin Updates

Latest version: 1.4 – Released June 15th, 2012

All the information for this plugin can be found over at the WordPress Plugin Directory: Disable WordPress Plugin Updates.

Don’t forget you can also disable WordPress core updates too.

WordPress Plugin: Global Post Password

Latest version: 1.5- Released November 2nd, 2012
  • WordPress 3.4 and 3.5 compatibility.
  • WordPress 3.4 or later is now a requirement.

Description

If you publish many password protected posts (or even if you don't), you may end up using the same password for every post. With this plugin you can define a global post password from your 'Settings -> Global Post Password' menu, and switch password protection on or off from the writing screen with just one click. When you change the global password, all password protected posts are automatically updated with the new password.

Note that this plugin does not automatically enable password protection on every post. It allows you to use a global password for every post that you choose to password protect.

Screenshots

  1. global-post-password screenshot 1

    Switching a post's password protection on or off.

  2. global-post-password screenshot 2

    The settings screen.

Installation

  • Unzip the ZIP file and drop the folder straight into your wp-content/plugins/ directory.
  • Activate the plugin through the ‘Plugins’ menu in WordPress.
  • Visit the ‘Settings -> Global Post Password’ menu in WordPress and set a global post password.

Now whenever you write or edit a post or page you’ll be able to switch password protection on or off with one click, instead of having to manually type in a password for each post. You can change the password whenever you like.

More Information

Please see the plugin’s page on the WordPress Plugin Directory for more information, including FAQs.

Download

ZIP file from downloads.wordpress.org

Any comments, questions, queries, suggestions, complaints, etc, please leave a comment below!

WordPress Plugin: Disable WordPress Core Update

Latest version: 1.4 – Released June 15th, 2012

Description

Completely disables the core update checking system in WordPress 2.3 and higher. It prevents WordPress from checking for updates, and prevents any notifications from being displayed in the admin area. Ideal for administrators of multiple WordPress installations.

Why would I want to disable it?

Most people should not disable this feature. It’s a fantastic feature of WordPress and I’m fully in support of it. However, administrators who maintain multiple installations of WordPress on behalf of other people (eg. clients, friends) may not want update notifications to be shown to the users of these installations. This plugin is for them.

Installation

This plugin is only for WordPress 2.3 and later. Earlier versions of WordPress did not have the core update notification system, therefore do not need this plugin.

Download the plugin using the link at the bottom of this page, unzip it and drop the folder straight into your wp-content/plugins directory. Activate it from WordPress’ Plugin panel.

Please note!

It’s very important that you keep your WordPress installation(s) up to date. If you don’t, your blog or website could be susceptible to security vulnerabilities. If you use this plugin, you must make sure you keep up to date with new WordPress releases and update your WordPress installation(s) as new versions are released.

Download

ZIP file from downloads.wordpress.org

You can also visit the plugin page on wordpress.org.

Any comments, questions, queries, suggestions, complaints, etc, please leave a comment below!

WordPress Plugin: Sign Out Reminder

Latest version: 0.2 – Released 26 July 2008

Description

This is a very straight forward plugin. It simply displays to every user who logs in a reminder to log out once they’ve finished using the admin interface. It’s not going to guarantee that anyone logs out, but if the users of your blog are likely to be logging in on public computers then it serves as a handy reminder. See the screen shot below:

A reminder to sign out displayed by the Sign Out Reminder plugin for WordPress

Installation

This plugin requires WordPress 2.0.2 or later. Download the plugin using the link at the bottom of this page, unzip it and drop the signoutreminder folder straight into your wp-content/plugins directory. Activate it from WordPress’ Plugin panel, then log out and log back in to see it in action.

Download

ZIP file from downloads.wordpress.org

Any comments, questions, queries, suggestions, complaints, etc, please leave a comment below!

Changelog

0.2: Change terminology to ‘Log Out’ instead of ‘Sign Out’
0.1: Initial release